
Given an existing OpenStack compatible environment and a deployed instance of OSC, this tutorial provides the necessary steps for setting up OSC to protect a single workload instance in OpenStack.
These steps include:
- Deployment of a security appliance instance.
- Definition of the workload under protection.
- Redirection of the traffic to be protected through the security appliance.
- In OpenStack, create a tenant and domain. This tutorial refers to the tenant as
TENANT, with the value "admin". The domain is referred to asREGION, with the value "RegionOne". - In OpenStack, create two virtual machines in the
TENANTandREGION. These virtual machines are hereby referred as theATTACKERand theVICTIM.
For OSC to function successfully, the following minimum network requirements must be met:
- Both the
ATTACKERandVICTIMmust be able to communicate to each other through HTTP. - Must contain two unique networks:
- One Management Network primarily for communication between the security manager and the Distributed Appliance Instance.
Note: If the security manager is externally hosted, both a router and an external network are needed for the security manager to communicate to the Distributed Appliance Instance. The network should be configured as shared and external.
- One Inspection Network for which redirected traffic will be intercepted.
For this tutorial, the network topology in OpenStack should be as follows:
-
MANAGEMENT NETWORK: This network corresponds to the Management Network mentioned above and it will also be overloaded with the deployment of the of theATTACKERandVICTIMand used for communication between both theATTACKERandVICTIM, the internal security manager, and the Distributed Appliance Instance. Its configurations consist of one port for theATTACKER, one for theVICTIMand one for the Distributed Appliance Instance. -
INSPECTION NETWORK: This network will be used for intercepting traffic sent from theATTACKERto theVICTIM. Its configurations consist of one port for theMANAGEMENT NETWORK, and one port for the Distributed Appliance Instance.

Network Topology in OpenStack
There are two options for obtaining a security appliance image and its corresponding manager plugin. The first option is to use an appliance image and manager plugin provided by a security manager vendor compatible with OSC. The second option is to manually create them.
For this tutorial, it is assumed that the appliance image and security plugin will be manually created:
- The
SAMPLE MANAGER PLUGINis a dummy plugin that is available along with OSC. - The
SAMPLE APPLIANCE IMAGEis a CirrOS image that is manually packaged. - Use the following meta.json file data when packaging the appliance image:
{
	"metaDataVersion": "1.0",
	"model": "CIRROS-TCPD",
	"managerType": "ISM",
	"managerVersion": "1.0",
	"virtualizationType": "OPENSTACK",
 	"virtualizationVersion": "Icehouse",
	"softwareVersion": "0.3.0.5000",
	"imageName": "cirrosWithTcpDump.qcow2",
	"minIscVersion": {
		"major": 0,
		"minor": 0,
		"build": 1,
		"versionStr": ""
	},
	"minCpus": 2,
	"memoryInMb": 1024,
	"diskSizeInGb": 2,
	"encapsulationTypes": ["VLAN"],
	"additionalNicForInspection": false
}OSC requires two components to implement traffic redirection and SDN notifications through an SDN controller, an SDN component and an SDN controller plugin. You may acquire these from an OSC compatible vendor or you can manually create them.
For this tutorial, it is assumed that the SDN component and SDN controller plugin will be manually created:
- The
SDN CONTROLLER NSC PLUGINis uploaded on OSC, enabling communication between the SDN controller and OSC. - The SDN Component which is deployed on OpenStack for NSC.
- TODO: add deployment steps
Within OSC, navigate to Manage > Plugins using the left-hand menu.
- Upload the
SDN CONTROLLER NSC PLUGIN. - Upload the
SAMPLE MANAGER PLUGIN.
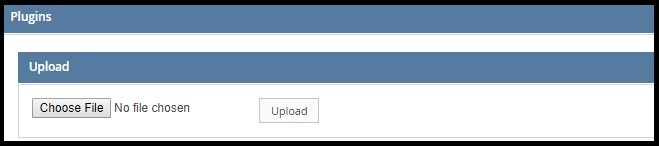
Upload SDN Controller and Manager Plugins
Using the left-hand menu, navigate to Setup > Virtualization Connectors, and then select Add.
- Enter a name and then select OPENSTACK as the type.
- Select NSC (Network Security Controller) as the type for the SDN Controller.
- For the Keystone:
- Give the IP address of the
TENANTenvironment in OpenStack. - Enter
adminas the Admin Tenant Name. - Enter the OpenStack administrator credentials.
- Give the IP address of the
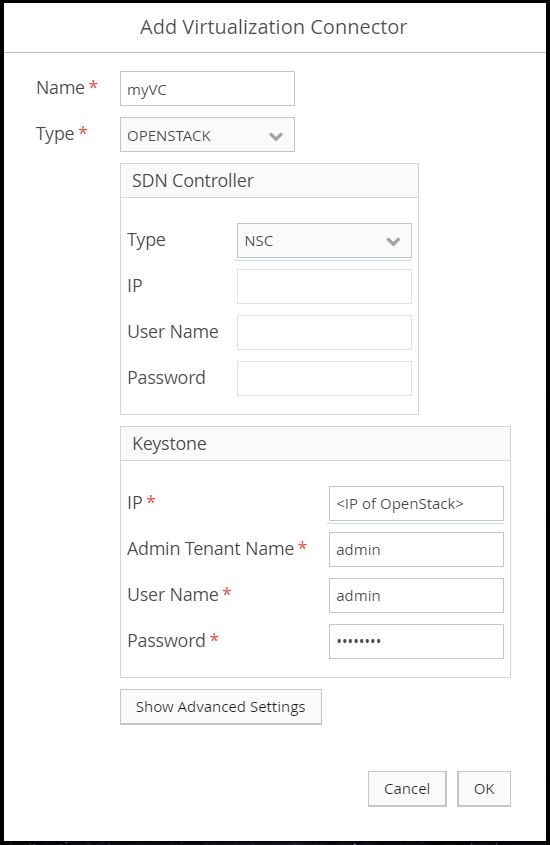
Add Virtualization Connector
Using the left-hand menu, navigate to Setup > Manager Connectors, and then select Add.
- Enter a name.
- For the type, select ISM as described by the
SAMPLE APPLIANCE IMAGEand theSAMPLE MANAGER PLUGIN. - Enter the IP address
1.1.1.1, and then the credentials ofabc / 123.Note: When using a real security manager, use the real IP address and credentials.
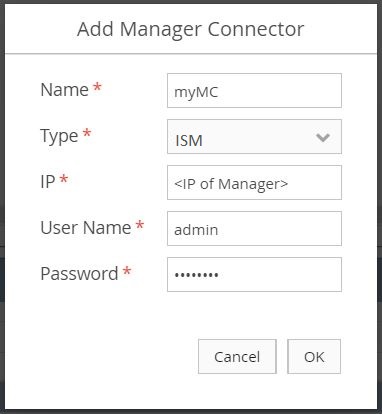
Add Manager Connector
After adding the manager connector, ensure the Last Job Status is PASSED and that policies defined in the security manager are populated under Polices on the bottom-half of the page.
Using the left-hand menu, navigate to Setup > Service Function Catalog, and then select Auto Import.
- Browse to the
SAMPLE APPLIANCE IMAGEand click OK to begin uploading the file.
Using the left-hand menu, navigate to Setup > Distributed Appliance. Under Distributed Appliances, select Add.
- Enter a name.
- Choose the previously created manager connector for the manager connector.
- Choose the
SAMPLE APPLIANCE IMAGEthat was previously imported into the security function catalog. - Select the Enabled box.
- Using the dropdown menu, select VLAN as the Encapsulation Type.
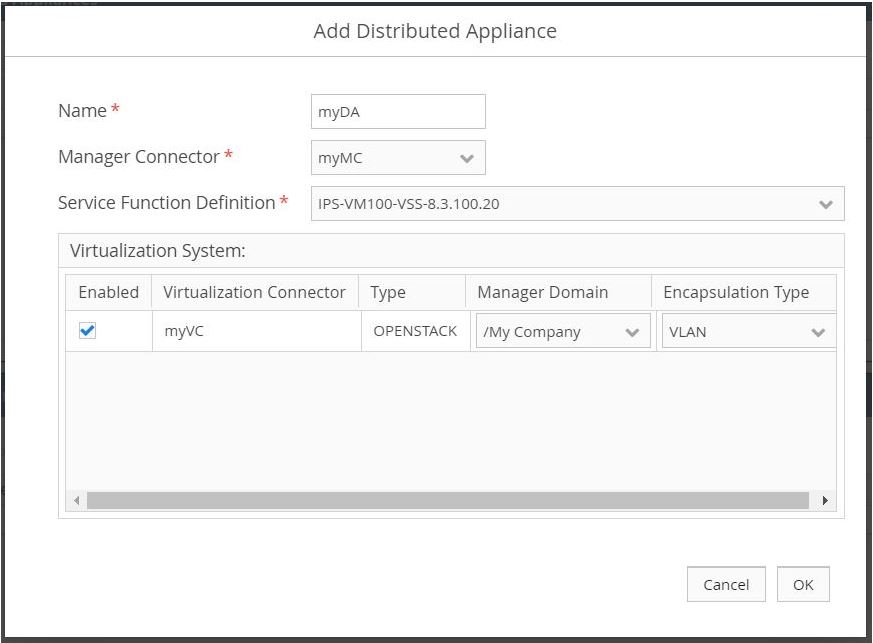
Add Distributed Appliance
Under the same menu, navigate to Setup > Distributed Appliance. Select Deployments from within the Virtual Systems section, and then select Add.
- Enter a name.
- Select the OpenStack
TENANT. - Select the OpenStack
REGION. - Select By Host for the Selection Criterion, and then check the Enabled box.
- Select the
MANAGEMENT NETWORKand theINSPECTION NETWORK. Do not select a floating IP pool unless you are using an external network with an external security manager.
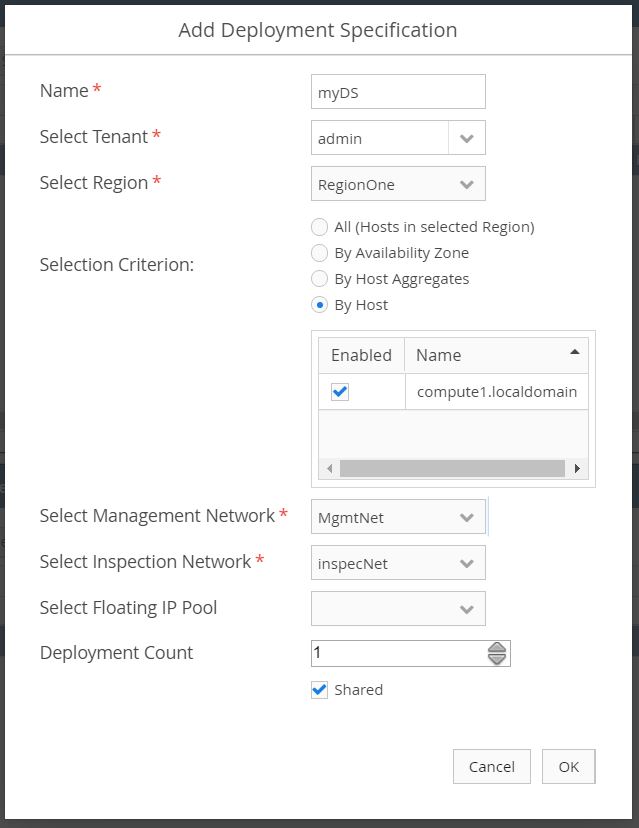
Add Deployment Specification
After creating a deployment specification, ensure that the Last Job Status is PASSED.
Using the left-hand menu, navigate to Setup > Virtualization Connectors, then select the virtualization connector that previously was created. Select Add on the lower half of the page under Security Group.
- Enter a name.
- Select the
TENANT. - Select the
REGION. - Select By Type and VM for the Selection Type.
- Observe both virtual machines deployed on OpenStack on the left and select the
VICTIM.VICTIMshould be on the right after selection.
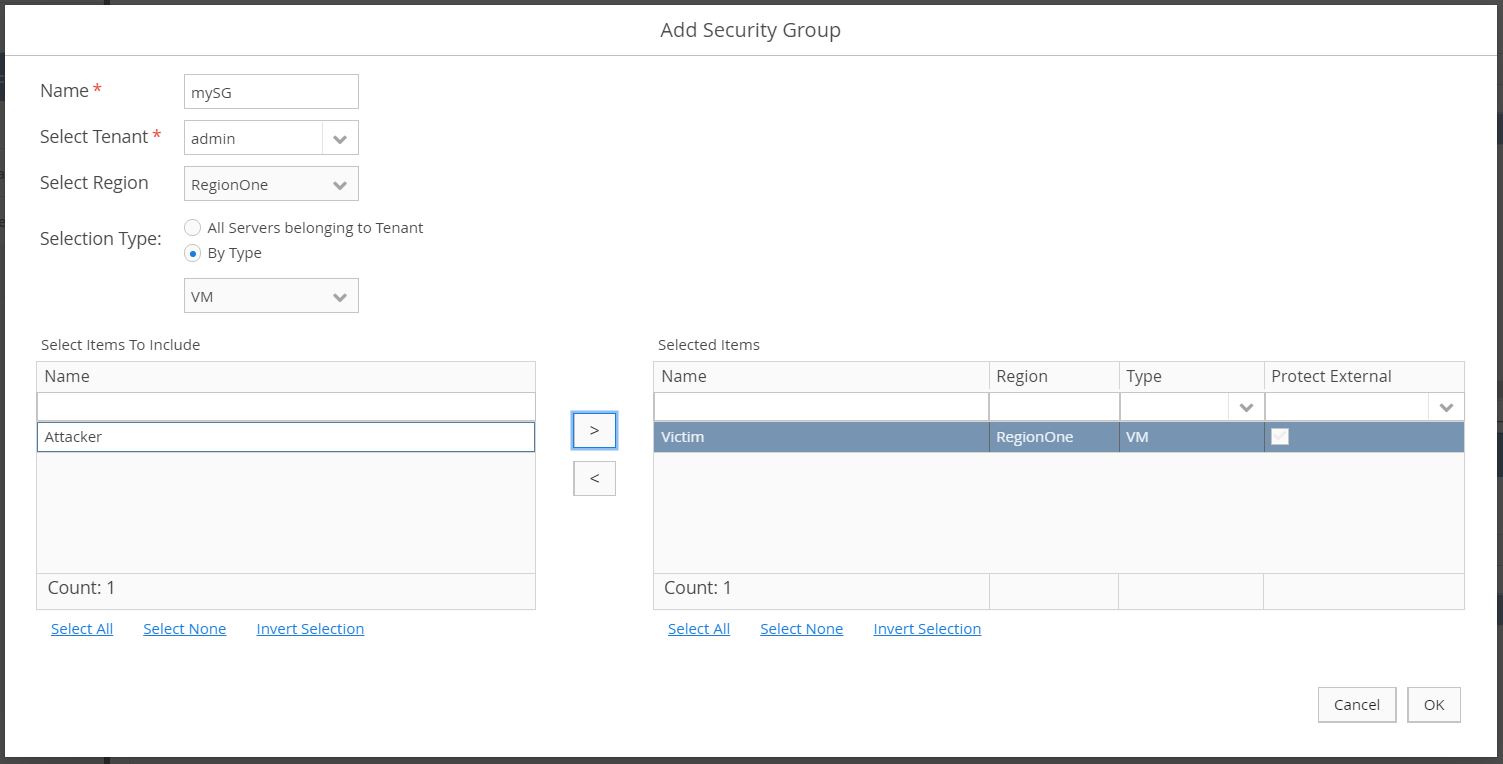
Add Security Group
Under the same menu, navigate to Setup > Virtualization Connectors, then select the newly created security group. Select Bind.

Select Security Group
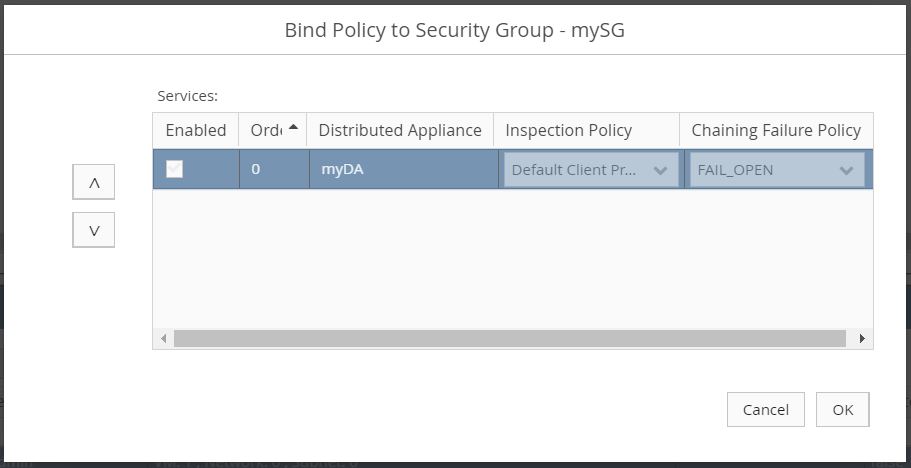
- Check the Enabled box.
- Choose an Inspection Policy from the dropdown menu.
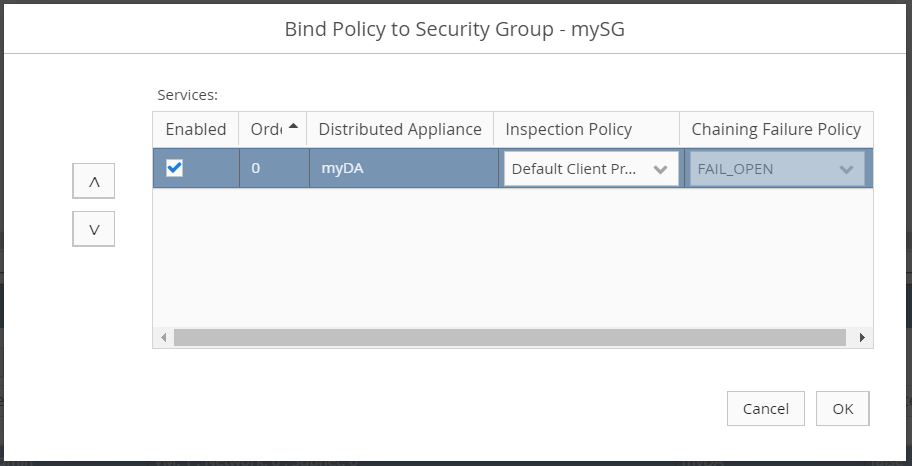
Bind Policy to Security Group
After binding, ensure that the Last Job Status is PASSED.
After setting up OSC and deploying a Distributed Appliance Instance, verify the Distributed Appliance Instance was deployed on OpenStack.
- Log in to OpenStack and navigate to Project > Compute > Instances.
- Observe that the Distributed Appliance Instance is listed as an instance in addition to the
ATTACKERandVICTIM. Ensure the Distributed Appliance Instance image name reflects previous naming actions taken such as the name of the Distributed Appliance Instance (myDA) and the name of the image uploaded in the Service Function Catalog.
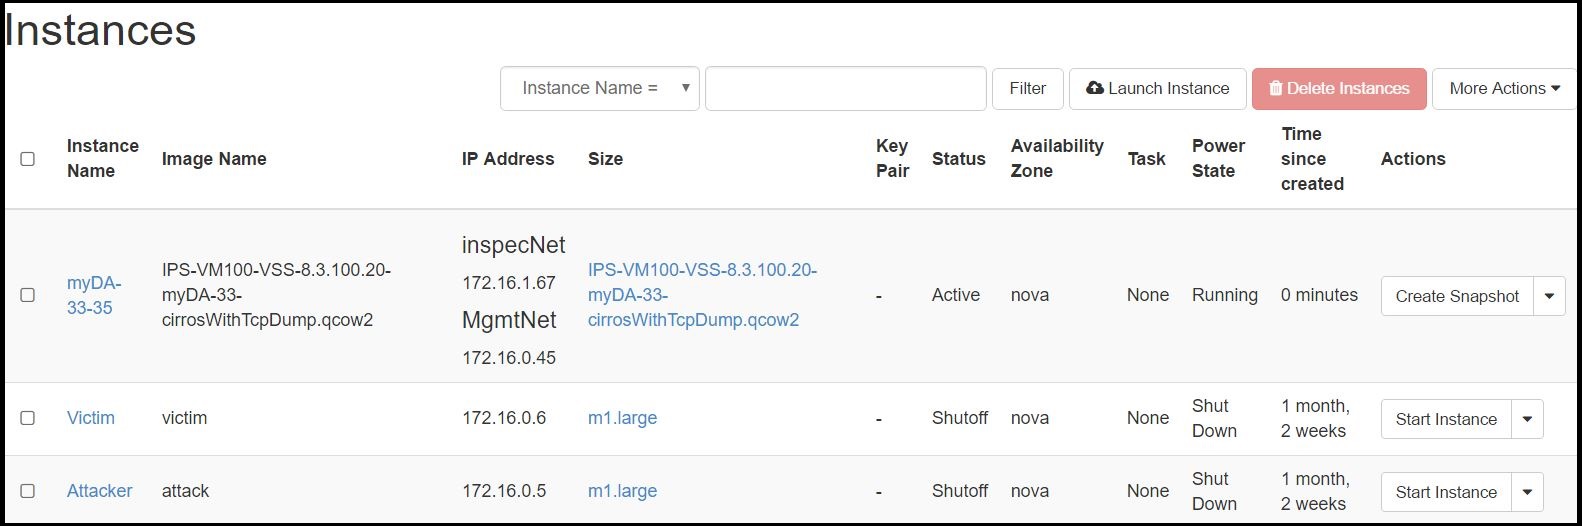
OpenStack Instances
In the case of using the dummy CirrOS image, when a policy is bound to a security group, no virtual machine can communicate to the protected virtual machine - the VICTIM - and any network traffic directed to the VICTIM will be intercepted by the Distributed Appliance Instance on the INSPECTION NETWORK. This is the expected behavior for the CirrOS image which implements a dummy behavior that always blocks traffic to the protected virtual machines. Let's take a look at the network traffic flow observed through the Distributed Appliance Instance when the security group is bound and when it is unbound.
- On OSC, ensure that the security group is bound.
- In the Overview tab for the
VICTIM, note theMANAGEMENT NETWORKIP address. TheATTACKERwill attempt to send an HTTP request to this address. - On OpenStack, navigate to Project > Compute > Instances, and then open the
ATTACKERand Distributed Appliance instances in different browser tabs. Ensure theVICTIMis powered on. - Switch to the Console view for both the
ATTACKERand Distributed Appliance instances. - From the
ATTACKERconsole, send an HTTP request to theVICTIM. For example, use the command:wget <VICTIM IP ADDRESS>. Note that there should be no connection. - From the Distributed Appliance console:
- From the command line, enter
sudo ip link set eth1 up. - Enter
sudo tcpdump -i eth1. - Observe the redirected packets coming from the
ATTACKERIP address on the eth1 interface. This means the binding was a success.
- From the command line, enter
- Unbind the security group on OSC by unchecking the Enabled checkbox.
Unbind the Policy from the Security Group
- From the
ATTACKERconsole on OpenStack, send another HTTP request to theVICTIM.- The HTTP request should be successful now that the security group is unbound.
- From the Distributed Appliance Instance, there should be no redirected traffic from the
ATTACKER.