
Given an existing Kubernetes compatible environment and a deployed instance of OSC, this tutorial provides the necessary steps for setting up OSC to protect a single workload instance in Kubernetes.
These steps include:
- Deployment of a security appliance instance.
- Definition of the workload under protection.
- Redirection of the traffic to be protected through the security appliance.
In Kubernetes, create two pods:
- The attacker pod:
This pod will have the container from which we will ping the victim pod. Create the pod configuration file:
$ cat >~/attacker-busybox.yaml <<EOL
apiVersion: v1
kind: Pod
metadata:
  name: attacker-busybox
  namespace: default
spec:
  containers:
  - image: busybox
    command:
      - sleep
      - "3600"
    imagePullPolicy: IfNotPresent
    name: attacker-busybox
  restartPolicy: Always
EOL
Create the pod:
$ kubectl create -f ~/attacker-busybox.yaml- The protected pod:
The protected pod that will be pinged by the attacker.
Note: Observe it has a label (env: production) which will be used later for creating a security group member in OSC.
Create the pod configuration file:
$ cat >~/victim-busybox.yaml <<EOL
apiVersion: v1
kind: Pod
metadata:
  name: victim-busybox
  namespace: default
  labels:
    env: production
spec:
  containers:
  - image: busybox
    command:
      - sleep
      - "3600"
    imagePullPolicy: IfNotPresent
    name: victim-busybox
  restartPolicy: Always
EOL
Create the pod:
$ kubectl create -f ~/victim-busybox.yamlThere are two options for obtaining a security appliance image and its corresponding manager plugin. The first option is to use an appliance container image and manager plugin provided by a security manager vendor compatible with OSC. The second option is to manually create them.
For this tutorial, it is assumed that the appliance image and security plugin will be manually created:
- The
SAMPLE MANAGER PLUGINis a dummy plugin that is available along with OSC.
OSC requires two components to implement traffic redirection and SDN notifications through an SDN controller, an SDN component and an SDN controller plugin. You may acquire these from an OSC compatible vendor or you can manually create them.
For this tutorial, it is assumed that the SDN component and SDN controller plugin will be manually created:
- The
SDN CONTROLLER NSC PLUGINis uploaded on OSC, enabling communication between the SDN controller and OSC.
Note: This plugin is configured to NOT support port grouping. In order for it to work with this tutorial it must be configured with
SUPPORT_PORT_GROUPas true and recompiled. Optionally you can also use the SDN Nuage Plugin if you have a Kubernetes environment configured with Nuage SDN controller.
Within OSC, navigate to Manage > Plugins using the left-hand menu.
- Upload the
SDN CONTROLLER NSC PLUGIN. - Upload the
SAMPLE MANAGER PLUGIN.
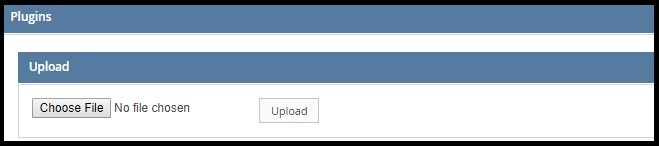
Upload SDN Controller and Manager Plugins
Using the OSC api-doc https://OSC_IP:8090/api-doc -> Operations for Virtualization Connectors:
-
POST /api/server/v1/virtualizationConnectorswith json payload:
{
  "name": "k8s-vc",
  "type": "KUBERNETES",
  "controllerIP": "string",  # IP Address of the SDN controller. Not needed if using the NSC SDN Plugin.
  "controllerUser": "string", # User name of the SDN controller. Not needed if using the NSC SDN Plugin.
  "controllerPassword": "string", # Password of the user of the SDN controller. Not needed if using the NSC SDN Plugin.
  "providerIP": "string", # IP Address for the kube API service.
  "providerUser": "string", # User name for accessing the kube API service.
  "providerPassword": "string", # Password for the user name accessing the kube API service.
  "softwareVersion": "v1.7",
  "controllerType": "NSC" # Or 'Nuage' if using Nuage SDN
}
You should get a response body containing an ID, similar to this "id":VIRTUALIZATION_CONNECTOR_ID, copy this identifier to be used on a later steps.
Using the left-hand menu, navigate to Setup > Manager Connectors, and then select Add.
- Enter a name.
- For the type, select ISM as described by the
SAMPLE APPLIANCE IMAGEand theSAMPLE MANAGER PLUGIN. - Enter the IP address
1.1.1.1, and then the credentials ofabc / 123.Note: When using a real security manager, use the real IP address and credentials.
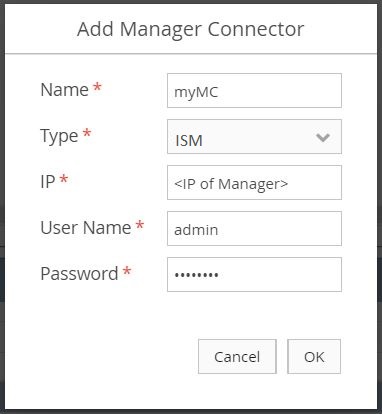
Add Manager Connector
After adding the manager connector, ensure the Last Job Status is PASSED and that policies defined in the security manager are populated under Polices on the bottom-half of the page.
Using the OSC api-doc https://OSC_IP:8090/api-doc -> Operations for Security Functions Catalog:
-
POST /api/server/v1/catalogwith json payload:
{
"model":"test-model",
"managerVersion":"1.0",
"managerType": "ISM"
}
You should get a response body containing an ID, similar to this "id":APPLIANCE_MODEL_ID, copy this identifier to be used on later steps.
Using the OSC api-doc https://OSC_IP:8090/api-doc -> Operations for Security Functions Catalog:
-
POST /api/server/v1/catalog/{applianceId}/versionswith json payload:
applianceId:APPLIANCE_MODEL_ID
{
"parentId":"APPLIANCE_MODEL_ID", # Obtained from the previous step.
"swVersion":"0.1",
"virtualizationType":"KUBERNETES",
"virtualizationVersion":"v1.7",
"imageUrl":"corfr/tcpdump"
}
Note: The
imageUrl: corfr/tcpdumpis the name of the Docker image OSC will deploy to represent a dummy container VNF. This image will be pulled from the public Docker registry when Kubernetes creates the pod(s) for the deployment.
You should get a response body containing an ID, similar to this "id":APPLIANCE_SOFTWARE_VERSION_ID, copy this identifier to be used on later steps.
Using the left-hand menu, navigate to Setup > Distributed Appliance. Under Distributed Appliances, select Add.
- Enter a name.
- Choose the previously created manager connector for the manager connector.
- Choose the appliance model that was previously imported into the security function catalog.
- Select the Enabled box.
After creating the distributed appliance, ensure that the Last Job Status is PASSED.
The creation of the distributed appliance will also generate a virtual system. In order to perform later you will the virtual system ID. To retrieve that perform the following steps:
Using the OSC api-doc https://OSC_IP:8090/api-doc -> Operations for Distributed Appliances:
GET /api/server/v1/distributedAppliances
You should get a response body containing the ID of the virtual system, similar to this "virtualSystem": [ { "id":VIRTUAL_SYSTEM_ID ... } ], copy this identifier to be used on later steps.
Because we are using the NSC SDN Controller stub plugin we must register the port element for the deployed VNF pod. This can be done using the test API:
-
POST https://10.3.205.173:8090/nsc/controller/10.3.205.177/networkElements/1with json payload:
{
"elementId":1,
"parentId":"1",
"deviceOwnerId":"default:testds",
"macAddresses":  ["00:00:00:00:00:01"],
"portIPs": ["70.70.0.1"]
}
Note: This step is not needed if you are using a real SDN controller plugin (as opposed to a stub) like the OSC Nuage plugin. The SDN controller should already have and be able to provide the pod port to OSC after a pod is created on Kubernetes.
Using the OSC api-doc https://OSC_IP:8090/api-doc -> Operations for Virtual Systems:
-
POST /api/server/v1/virtualSystems/{vsId}/deploymentSpecswith json payload:
vsId:VIRTUAL_SYSTEM_ID
{
 "name": "testds",
 "namespace": "default",
 "count": 1
}
On the OSC UI you should see a deployment spec testds with the Last job Status PASSED.
Troubleshooting:
If the job failed perform the following steps to troubleshoot:
- Ensure that you are able to create pods on the Kubernetes cluster using the image
corfr/tcpdump. - Ensure that OSC can communicate with the Kubernetes API server through the proxy.
Because we are using the NSC SDN Controller stub plugin we must register the port element for the protected pod. This can be done using the test API:
-
POST https://10.3.205.173:8090/nsc/controller/10.3.205.177/networkElements/2with json payload:
{
"elementId":2,
"parentId":"1",
"deviceOwnerId":"default:victim-busybox",
"macAddresses":  ["00:00:00:00:00:02"],
"portIPs": ["70.70.0.2"]
}
Note: This step is not needed if you are using a real SDN controller plugin (as opposed to a stub) like the OSC Nuage plugin. The SDN controller should already have and be able to provide the pod port to OSC after a pod is created on Kubernetes.
Using the OSC api-doc https://OSC_IP:8090/api-doc -> Operations for Virtualization Connectors:
-
POST /api/server/v1/virtualizationConnectors/{vcId}/securityGroupswith json payload:
vcId:VIRTUALIZATION_CONNECTOR_ID
{
"name": "testSG"
}
You should get a response body containing the ID of the create security group, similar to "id": SECURITY_GROUP_ID, copy this identifier to be used on later steps.
Using the OSC api-doc https://OSC_IP:8090/api-doc -> Operations for Virtualization Connectors:
-
PUT /api/server/v1/virtualizationConnectors/{vcId}/securityGroups/{sgId}/memberswith json payload:
vcId:VIRTUALIZATION_CONNECTOR_ID
sgId:SECURITY_GROUP_ID
{
	"parentId": "VIRTUALIZATION_CONNECTOR_ID",  # Obtained from the Virtualization Connector creation.
	"id": "SECURITY_GROUP_ID", # Obtained from the previous step.
	"members": [
	 {
		"name": "env-production",
		"type": "LABEL",
		"label": "env=production"
	  }
	]
}
Note: Observe the label provided above
env=productionis the same label in the protected pod (victim-busybox) created previously.
On the OSC UI you should see the Last Job Status of the created security group is PASSED. When clicking on Membership you should see one member in the security group with the IP address 70.70.0.2.
Using the OSC api-doc https://OSC_IP:8090/api-doc -> Operations for Virtualization Connectors:
-
PUT /api/server/v1/virtualizationConnectors/{vcId}/securityGroups/{sgId}/bindingswith json payload:
vcId:VIRTUALIZATION_CONNECTOR_ID
sgId:SECURITY_GROUP_ID
	[
	  {
	    "virtualSystemId": "VIRTUAL_SYSTEM_ID", # Obtained from the creation of the distributed appliance.
	    "name": "sgbind",
	    "policyIds": [
	      "POLICY_ID" # Retrieved from GET /api/server/v1/virtualSystems/{vsId}/policies
	    ],
	    "order": 0,
	    "markedForDeletion": false,
	    "binded": true
	  }
	]
After binding, ensure that the Last Job Status is PASSED.
After setting up OSC and deploying a Distributed Appliance Instance through the creation of a Deployment Spec, verify the Distributed Appliance Instance was deployed on Kubernetes:
$  kubectl get deployments
NAME        DESIRED   CURRENT   UP-TO-DATE   AVAILABLE   AGE
testds-XX   1         1         1            1           3h
There should be one deployment prefixed with the name of the deployment spec created on OSC.
You can also see the corresponding pod:
$ kubectl get pods | grep testds
testds-XX-XXXXXXXXX 1/1 RunningThe orchestration and application of containerized security functions provided by OSC in Kubernetes is currently alpha. Below are some the limitations:
-
UI support: The following operations supported by OSC for Kubernetes are not exposed in the UI, being available in the API only: creating/updating virtualization connectors, security groups and deployment specs; importing appliance model and sofware version; binding a security group to a security policy.
-
Automatic synchronization with the virtualization environment: OSC has the capability of automatically identifying changes in the virtualization environment and reacting to them accordingly. Common examples of these are any changes on the deployed VNF instances or new workloads coming up that should be protected. For Kubernetes this fully automated synchronization is not yet implemented. Changes are only detected by OSC when the user manually resyncs the deployment spec or security group using the OSC UI or corresponding APIs.
When using a real SDN controller plugin, like Nuage, you should be able to validate the traffic redirection when a policy is bound to a security group. For that you can perform the following steps on your Kubernetes cluster:
- SSH to the node hosting
attacker-busyboxpod. To know which Kubernetes node is hosting the pod you can run:
$ kubectl describe pods attacker-busybox | grep Node
Node: minion01- SSH to the node hosting the security VNF pod. To know which Kubernetes node is hosting the security VNF pod you can run:
$ kubectl describe pods testds-XX-XXXXXXXXX  | grep Node  # Replace with the real pod name
Node: minion01- From the SSH session for the
attacker-busyboxidentify the container ID (ATTACKER_CONTAINER_ID) and IP address (ATTACKER_IP_ADD) of theattacker-busybox:
$ docker ps | grep k8s_attacker-busybox$ docker exec ATTACKER_CONTAINER_ID ip add- From the SSH session for the
attacker-busyboxping the protected pod (victim-busybox) from within the attacker container:
$ docker exec ATTACKER_CONTAINER_ID ping PROTECTED_POD_IP # You can get the PROTECTED_POD_IP from the OSC UI by looking at the members (Membership) of the created security group.If the security group is bound the ping operation should not reach the target.
- From the SSH session for the security VNF pod identify the ID (
VNF_CONTAINER_ID) of the VNF container:
$ docker ps | grep k8s_testds- From the SSH session for the security VNF pod inspect the traffic from within the VNF container:
$ docker exec VNF_CONTAINER_ID tcpdump -i eth0 | grep ATTACKER_IP_ADDIf the security group is bound the tcpdump command should show flowing traffic.